Hair Contouring with Hair Extensions
Posted by Hair Flair on 19th Nov 2017
Hair Contouring 101
It’s hard to say when contouring really started, but today, many makeup artists credit the legendary Max Factor, for coining the contouring term as well as the technique. Now-a-days, because of celebs like Kylie Jenner and Kim Kardashian West, pretty much everyone is familiar with the miracle that is facial contouring.
We use shading and highlighting on the skin to accentuate/manipulate the structure of something, for example the cheekbones. Women worldwide are now using contouring as a way to transform themselves, but this blog isn’t about make-up; it’s about hair contouring using Hair Extensions!
Hair contouring is much of the same idea as facial contouring – its goal is to compliment your face shape and work with your skin tone. It uses a specific and accurate freehand approach to highlighting/shadowing your hair in distinct areas.
Depending on your face shape, you can have your stylist target specific areas, or create an all over effect - easily achievable with the use of our hair extensions, and placing them strategically for that contoured effect!
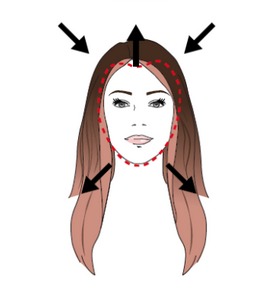
Round & Square Shaped Faces

The Goal: Create a more elongated face shape.
Using Colour: We suggest applying lighter shades nearer to the roots and ends of your hair, and darker shades along the sides. This will create the illusion of a lengthened face with a better defined cheekbone and jawline area.
Using Hair Extensions if you have a rounder face you will want to elongate it. The best way to do this is buy adding length. Adding longer hair will elongate the face and make your face appear thinner.
Diamond, Oblong & Rectangular Shaped Faces

The Goal: We want to “widen” the face.
Using Colour: To create this illusion, you will need darker tones to the roots and nearer the chin/jawline, and lighter sections close to the ear height. By doing this contour trick, the sides of the face will appear wider and fuller, creating that perfect oval shape.
Using Extensions: You want to add extension more in the sides and temples to create more volume around the face. You can use some lighter pieces of extensions around the face to create the illusion of a wider face shape. Dont add really long extensions as it will elongate the face more, you will want to stay with a medium length style.
Triangle & Heart Shaped Faces

The Goal: Minimize the forehead, widen the jawline
Using Colour: These face shapes are much wider at the forehead, and pointier towards the chin. We recommend applying dark colours near the crown, with lighter shades outlining the edge of the face. This will help create the effect of a narrower forehead. We can soften a pointy chin by using lighter hair at the ends. This is the perfect face shape for ombre or a balayage effect. This can be achieved by adding ombre extensions like these.
Using Extensions: Place most of the extensions in the lower portion of the head and do not add any in the temple region or crown region. Add the bulk of the extensions so it sits at the chin line and below.

